This article was originally written in English. However, an automatically translated version can be found here.
When it comes to hosting public services online (such as a website, the backend of an application…), several options can be considered. The most common one is to rent a dedicated server from a hosting company and to host the desired service there. However, this option can end up being too costly depending on the hardware and software needs of such service, that could lead us to consider an alternative option.
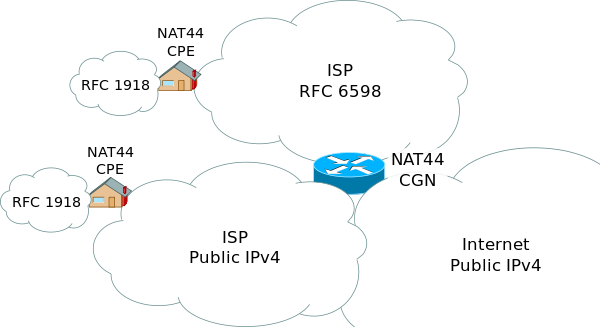
A great choice could be to host our own server, either at home or in the office. In that case, two problems arise: having a dynamic IP, which is what most ISPs offer to the general public (and could be solved by using Dynamic DNS); and the hassle of sharing the public IP of our office/home, so that anyone can connect to the service (and also attack it).
Moreover, due to the IPv4 address exhaustion problem[1], lately several ISPs are starting to implement a network design approach known as Carrier-Grade NAT[2] (or CG-NAT), that groups several clients in the same public IP, which does not allow for port forwarding, and could make it impossible to host any public service from our local network.
In those cases, or in any other in which it is of our interest to hide the IP of a computer that hosts a public service, a reverse proxy could be the solution to that problem.
Definition
A reverse proxy[3] can be defined as a type of proxy server that retrieves resources on behalf of a client from one or more servers. These resources are then returned to the client, appearing as if they originated from the server itself.
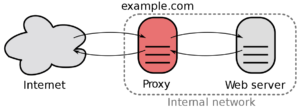
The process of interchanging network packets would be as follows:
- The client connects to the proxy‘s IP, sending some packets
- The proxy redirects those packets to the final server through a VPN.
- The final server processes the request and returns the packets to the proxy.
- The proxy sends the reply to the client, who sees from his perspective that the packets have been processed in the proxy.
Using this method, the IP that would be exposed to the Internet would be the proxy one, so in case of receiving an attack, it would be enough to shutdown the proxy machine in order to stop the attack and to save the local network from going down.
Installation
For the installation process[4], it is assumed that both systems run a Debian-based Linux distribution. The following steps are divided into two parts: the proxy server and the final server side.
1: Proxy server
For the proxy server, iptables will be the software in charge of routing the packets to the final server. Although it comes preinstalled in most Linux distributions, we will make sure by running:
sudo apt-get install iptables
Once the installation ends, the next step is to install the VPN server that will establish the connection between the proxy and the final server, which in this case is OpenVPN. To do so, we will run the following command[5]:
wget https://git.io/vpn -O openvpn-install.sh && bash openvpn-install.sh
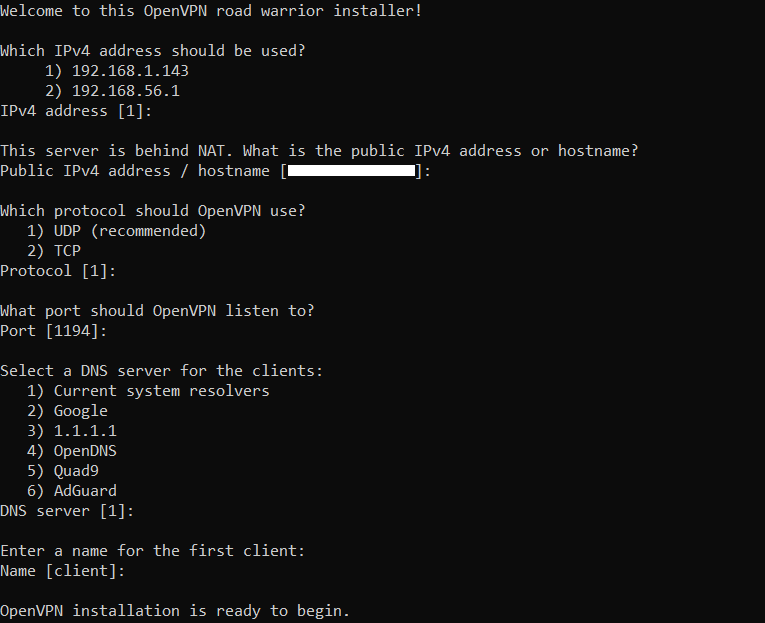
The installer will ask for several preferences, that you can mostly leave with their default values. When the server finishes its installation, it will be automatically started, and a VPN profile with the ‘.ovpn‘ extension will be created. That file needs to be transferred to the final server.
2: Final server
Now that we already have the VPN up and running, we can connect to it from our final server. To do so, first of all the OpenVPN client must be installed, by running:
sudo apt-get install openvpn
When the installation finishes, we can now connect to the server. We will navigate to the folder in which the previous ‘.ovpn‘ file is now located, and then the connection can be started by running:
sudo openvpn profile.ovpn
At this time the tunnel between the proxy and the final server is already created, and only packet redirection is left to configure. For the last part of the installation in the proxy server, we need to get the IP address that the VPN adapter has assigned to the final server. This address can be obtained by using:
sudo ip a
And then it will be located in the inet section of the corresponding adapter, that will have a name like ‘tun0‘. You should take note of it, as it will be required in further steps.
3: Proxy server
Once we have the VPN tunnel already set up, the last step is to create the forwarding rules that will route packets from the proxy to the final server. To do it, we will change the iptables‘ configuration.
First, export your current configuration by executing the following command:
sudo iptables-save > /path/to/config.cfg
After the previous command, the current configuration will be stored in the specified path. Next up, open it with a text editor and modify the ‘*nat‘ section with the following values:
*nat
:PREROUTING ACCEPT [0:0]
:INPUT ACCEPT [0:0]
:OUTPUT ACCEPT [0:0]
:POSTROUTING ACCEPT [0:0]
# Forwarding incoming port 80 on proxy to final server IP's port 8080 through it's VPN IP
-A PREROUTING -p tcp -m tcp --dport 80 -j DNAT --to-destination IP_VPN_FINAL:8080
# Change source ips from VPN IP to VPS' IP for all outbound traffic
-A POSTROUTING -s 10.8.0.0/24 -j SNAT --to-source VPS_PUBLIC_IP
The previous example contains a forwarding rule that redirects connections arriving to proxy’s port 80, to final server’s port 8080 in the TCP protocol. However, several lines can be added to allow for different ports and protocols to be forwarded, following this pattern:
-A PREROUTING -p PROTOCOL -m PROTOCOL --dport PROXY_PORT -j DNAT --to-destination IP_VPN_FINAL:SERVER_PORT
In that configuration example, some values must be also replaced depending on your own addresses:
- IP_VPN_FINAL corresponds to the previously noted VPN adapter’s IP of the final server.
- VPS_PUBLIC_IP corresponds to the public IP of the proxy, the one that will be shared for the users to connect to the server.
If you do not know the public IP of the proxy server, it can be obtained by using this command:
dig +short myip.opendns.com @resolver1.opendns.com
When all the desired ports are configured with their respective rules, save the file and execute the following command to import it into iptables:
sudo iptables-restore < /path/to/config.cfg
You must ensure that the proxy server has the required incoming ports and the VPN port (normally 1194 – UDP) open, to allow for the users and the final server to connect to the proxy, respectively. Furthermore, the hosted server(s) must be listening for connections on the VPN IP.
Once the configuration is saved, the installation of the reverse proxy is complete, and the real IP of the final server will not be visible from external clients, as from their perspective it is the proxy who processes the requests.
Known issues
- During the configuration of this proxy on my own servers, the final server could not resolve DNS queries once connected to the VPN tunnel. Changing the DNS servers in the operating system’s configuration to Google DNS solved the problem.
References
- [1]IPv4 address exhaustion on Wikipedia
- [2]Carrier-grade NAT on Wikipedia
- [3]Reverse proxy on Wikipedia
- [4]Installation process idea by /u/Butterface_Fixer on Reddit
- [5]OpenVPN installation script by Nyr on Github